How To Pack Spices For Moving
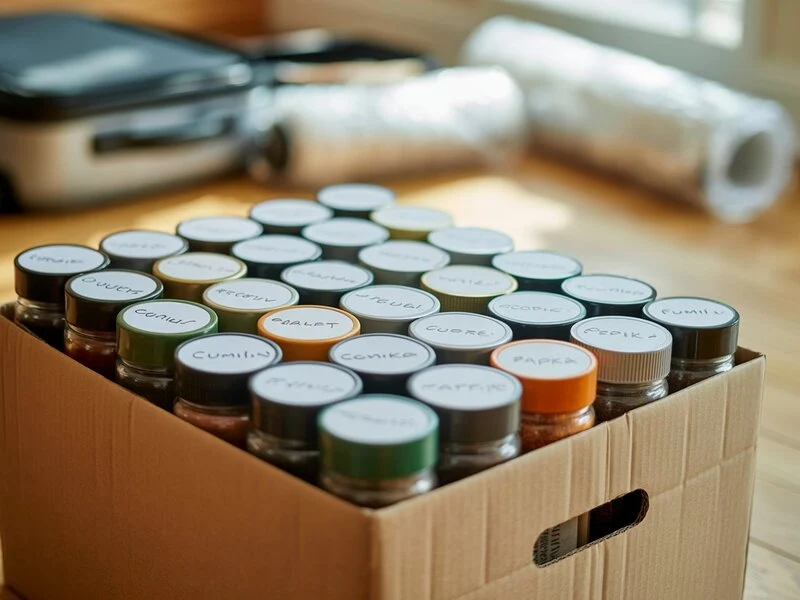
How to pack spices for moving can feel like a small task, but it plays a big role in keeping your kitchen organized during a relocation. Spices are often stored in glass jars or fragile containers, and if not packed correctly, they can break, spill, or lose their freshness. Their strong aromas can also transfer to other items if not sealed properly. Preserving the quality of your spices and avoiding messes during transit requires just a bit of planning. In this guide, we’ll walk you through how to pack spices for moving in five easy steps, so your favorite seasonings arrive safely and ready to use in your new kitchen. Why Properly Packing Spices is Important Prevents Messes and Cross-Contamination When spices are not sealed or packed properly, they can spill inside the box and create a mess. This not only wastes your spices but can also cause cross-contamination with other kitchen items like dry goods or utensils. Cleaning up spilled spices can be time-consuming and frustrating during the already busy moving process. Protects Fragile Spice Jars Many spices are stored in glass jars or thin plastic containers that can easily break or crack if they shift during the move. A broken spice jar not only results in lost ingredients but also increases the risk of injury from shattered glass. Secure packing adds a layer of protection and keeps containers from knocking into each other. Maintains Freshness Spices lose their flavor and aroma when exposed to air, moisture, or heat. Improper packing can allow these elements to sneak in during the move. Sealing spices tightly and choosing the right packing materials helps preserve their quality so they remain fresh and flavorful when you unpack. Helps with Organized Unpacking Properly packed and labeled spices make it much easier to set up your kitchen in your new home. You won’t have to guess what’s inside each container or waste time sorting through mixed-up spices. An organized start in the kitchen can help you settle into your new space more smoothly. Gathering the Necessary Packing Materials To pack spices securely for a move, having the right materials on hand is essential. These items will help protect your containers, prevent spills, and make unpacking easier once you arrive at your new home. Small, Sturdy Boxes Use small boxes that are strong enough to hold the weight of multiple spice jars without collapsing. Smaller boxes are also easier to handle and reduce the risk of overpacking. Bubble Wrap or Packing Paper Wrap each spice jar or container with bubble wrap or packing paper to prevent breakage. This extra layer acts as a cushion and protects against shocks during transport. Ziplock Bags or Airtight Containers Place spice jars or pouches inside Ziplock bags for an extra layer of leak protection. If you prefer, you can transfer loose spices into airtight containers to prevent spills and preserve freshness. Labels and Markers Label each container or bag with the name of the spice. Also, label the outside of the box with “Spices” and “Fragile” to make unpacking more efficient and keep movers aware of delicate items. Tape and Cushioning Material Use strong packing tape to seal your boxes and secure any wrapping. Cushioning materials such as kitchen towels, foam peanuts, or crumpled paper should be placed around the spice containers inside the box to keep them from shifting during transit. Preparing Your Spices for Packing Before you start packing, it’s important to prepare your spices properly. This step helps reduce clutter, protects your items, and ensures a smooth unpacking experience in your new kitchen. Check for Expired Spices and Declutter Go through your spice collection and check the expiration dates. Discard any old, expired, or unused spices. There’s no point in packing items you won’t use in your new home. This also helps lighten your moving load. Transfer Spices to Uniform Containers (If Needed) If you have spices stored in bulky, fragile, or mismatched containers, consider transferring them into uniform, durable jars or plastic containers. This saves space and reduces the risk of breakage. Choose containers with secure lids to avoid leaks. Seal Loose or Open Containers with Tape or Plastic Wrap For any containers that have already been opened, seal the lids tightly using plastic wrap, foil, or packing tape. This extra step prevents spices from spilling inside the box during the move. Group by Type: Baking Spices, Cooking Spices, Herbs, and More Organize your spices into categories before packing. Group together baking spices like cinnamon and nutmeg, cooking spices like cumin and turmeric, and herbs like oregano and basil. This makes unpacking easier and helps you set up your new kitchen faster. How to Pack Spices for Moving in Five Easy Steps Packing spices doesn’t have to be complicated. With a simple step-by-step approach, you can keep your spices safe, organized, and fresh throughout the move. Here’s how to pack spices for moving in five easy steps: Step 1: Sort and Categorize Start by grouping your spices by type or usage. You can organize them into categories like daily-use spices, baking spices, or specialty herbs. Sorting them now will save you time and effort when setting up your new kitchen. Step 2: Seal Containers Tightly Make sure all lids are closed securely. For extra safety, use plastic wrap or packing tape around the lid of each jar. If you’re using glass containers, wrap them individually with packing paper or bubble wrap to prevent breakage during transport. Step 3: Use Plastic Bags for Extra Protection Place each spice container or wrapped jar inside a Ziplock bag. This provides a second layer of protection in case anything spills. It also helps contain strong aromas that might otherwise spread to other packed items. Step 4: Pack in a Small Box with Cushioning Choose a small, sturdy box to avoid overloading. Line the bottom of the box with soft material like kitchen towels, paper, or foam. Carefully place the spice containers upright and fill in any empty spaces with