Get a Free Quote

Edit Template

Author name: 2m54a

How to Pack Plates to Move Without Breaking Them
Moving and Packing Services

How To Pack Plates To Move

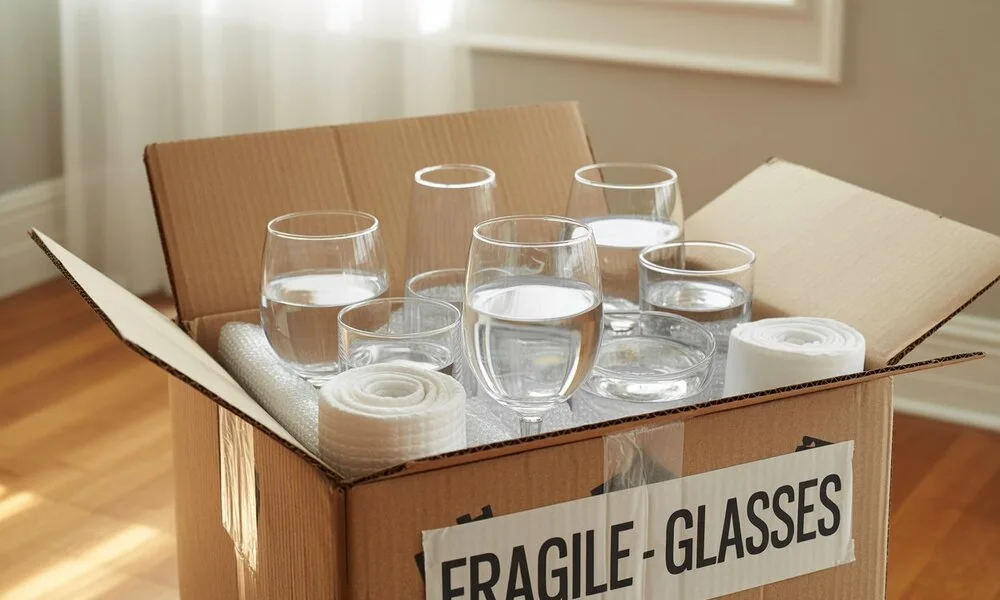
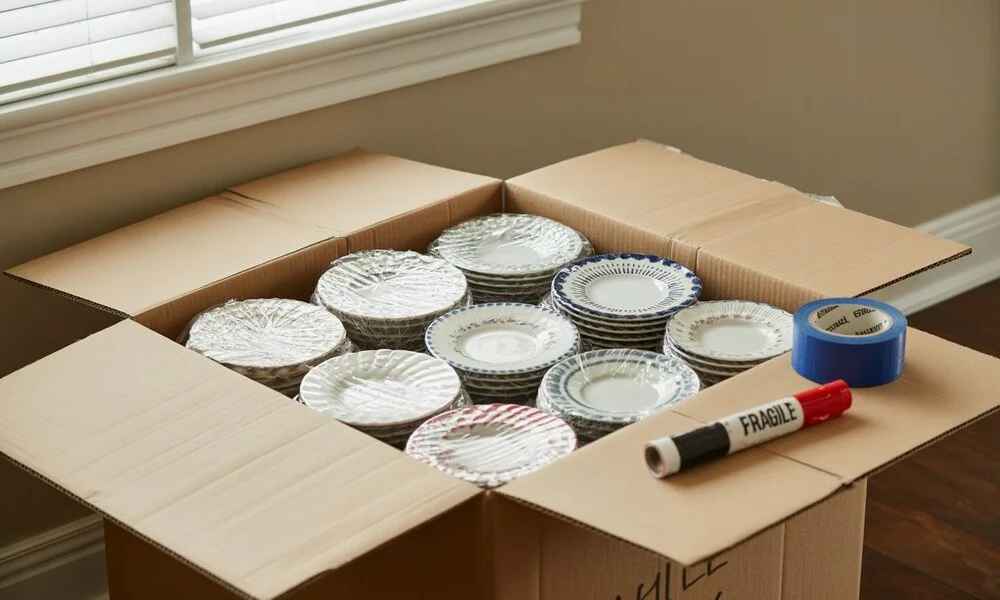
How to pack plates to move the right way is one of the most important parts of getting ready for a safe and smooth move. Plates are fragile and can easily break if they’re not packed properly. Without the right care, they can get chipped, cracked, or even shattered during the move. That’s why taking a few simple steps to protect them can save you stress, time, and money. Whether you’re moving across town or to a new city, knowing how to pack your plates the correct way helps keep your kitchenware safe and your unpacking process much easier. Actions to Take Prior to Packing Plates for Transportation Before you start putting your plates into boxes for plates, it’s important to get everything ready to avoid any damage. Plates are fragile and can break easily during a move, so preparing the right way is key. Before packing your dishes for relocating, follow this easy list of steps: 1. Gather All the Right Supplies First, collect everything you’ll need to pack your plates safely. These include: Sturdy boxes (small to medium size are best for heavy items like plates) Bubble wrap or foam sheets for extra cushioning Packing paper or newspaper to wrap each plate Strong packing tape to seal the boxes Labels or markers to mark boxes as “FRAGILE” and note which room they belong to You may avoid last-minute stress and save time by having the appropriate items on hand. 2. Clean and Dry Your Plates Thoroughly Make sure your plates are clean and completely dry before packing. Any leftover moisture can lead to mold or damage, especially during long-distance moves. Wipe them down with a soft cloth after washing and let them air-dry if needed. 3. Set Up a Designated Packing Area Choose a spotless, level area to utilize as your packing station, such as a kitchen counter or dining table. Having a set space will help you stay organized and avoid breaking anything by accident. Lay out your supplies here for easy access. 4. Separate Fragile from Durable Items Sort your dishes before you start packing. Put your delicate plates—like glass or fine china—aside from sturdier ones like plastic or metal. This way, you can give more padding and attention to the breakable items and save time when packing the rest. 5. Consider Downsizing or Donating Unused Dishes Before wrapping every single plate, ask yourself if you really need them all. If you have extras or ones you don’t use often, now is a great time to donate them to a local charity or give them to a friend. On moving day, this will lighten the load and make packing simpler. You may read about How To Pack Glasses For Moving. 5 Easy Steps | How to Pack Plates to Move Plates are among the most delicate items to pack when moving. They can easily broken, chipped, or cracked if not properly cared for. That’s why it’s important to follow a step-by-step process that protects your dishes from damage. Here are 5 easy and effective steps to help you pack plates for a move safely and quickly. Step 1: Choose the Right Box Boxes for plates should be chosen carefully to keep your dishes safe during a move. Avoid using large boxes, as they can get too heavy and difficult to handle when filled. Instead, opt for small to medium-sized boxes for plates that are sturdy and double-walled, offering better protection against cracks and breakage. Pro tip: Reinforce the bottom of the box with extra packing tape. Use at least two to three layers of tape in a crisscross pattern to make sure the bottom stays strong during the move. Avoid using boxes that have been damaged or reused too many times—they might not hold up. This first step sets the foundation for safe packing and avoids accidents during loading or unloading. Step 2: Cushion the Bottom of the Box Before placing any plates inside, create a soft, padded layer at the bottom of the box. This layer acts like a shock absorber and helps prevent pressure cracks when the box is lifted or stacked. You can use: Crumpled packing paper Bubble wrap Foam sheets Even towels or dishcloths if you’re in a pinch Make sure the padding is thick enough (about 2–3 inches) to protect the first layer of plates. Step 3: Wrap Each Plate Individually This is the most important part. Never place bare plates directly into the box. Instead, wrap each one individually to protect against scratches and impacts. Wrap each plate in bubble wrap or packing paper. Start from one corner of the paper, place the plate in the middle, and fold over the corners until fully covered. For extra protection, wrap fragile plates twice. Once wrapped, stack plates in bundles of 4 to 5 max and place a sheet of packing paper between each plate in the bundle. Avoid over-packing the plates in one group—smaller stacks are more stable and safer. Step 4: Pack Plates Vertically When placing the wrapped plates in the box, do not lay them flat. Instead, stand them on their edge—like you would store vinyl records. This reduces pressure on the surface and makes them less likely to break. Place the plates upright in a row, side by side. Fill in any gaps with crumpled packing paper, dish towels, or foam inserts. This will prevent the plates from shifting around inside the box. Remember: A tight pack is a safe pack—but don’t overfill the box to the point where it’s bulging. Step 5: Seal and Label the Box Once all plates are packed and the top is padded with more cushioning material, it’s time to close, seal, and label the box. Use strong packing tape to secure the top of the box tightly. Clearly label the box as “FRAGILE – PLATES” using a bold marker. Write “This Side Up” on the top and sides of the box to guide movers or anyone handling the box. Proper labeling

How to Prepare Furniture for Long Distance Moving
Moving and Packing Services

How To Prepare Furniture For Long Distance Moving

How to prepare furniture for long distance moving starts with understanding the challenges involved like the risk of damage, furniture shifting during transit, and maneuvering large pieces through tight doorways or hallways. A long-distance move requires more than just basic packing; it needs detailed planning to prevent unnecessary damage or delays. Preparing your furniture properly helps ensure it stays intact, protected, and ready to use when it reaches your new home.  Without taking the right steps, you could end up dealing with scratches, broken parts, or even major repairs. From using the right packing supplies to applying proven wrapping and securing techniques, this guide will cover everything you need to know to move your furniture safely and efficiently. With careful preparation, your move can be smooth and worry-free. Why Preparing Furniture for Long-Distance Moving is Important When you’re moving furniture a long way, getting it ready the right way is very important. Here’s why: 1. Avoiding Damage on the Road Long-distance moves can be rough on your furniture. The truck may hit bumps, roads can be uneven, and your items may shift around. Also, changes in weather (like heat, cold, or moisture) can affect wood, fabric, or metal. Furniture might become scratched, broken, or bent if it is not packed and protected properly. 2. Poor Packing Can Cost You If furniture gets damaged because it wasn’t packed well, you might have to spend a lot of money fixing or replacing it. Movers may also charge more if packing takes longer or if your items aren’t ready to load. This means extra costs you didn’t plan for. 3. Good Prep Saves Time and Money When your furniture is properly prepared wrapped, disassembled if needed, and labeled it’s easier and faster for movers to load and unload. This can reduce labor costs and prevent delays. Plus, it gives you peace of mind knowing your furniture is safe. Essential Furniture Moving Supplies When preparing for a major move, having the right furniture moving supplies is crucial. The proper tools not only make the process more manageable but also help protect your belongings from damage. Here’s a breakdown of essential supplies every mover should have: Moving Blankets and Furniture Pads  These thick, padded covers are vital for protecting furniture surfaces from scratches, dents, and other damage during transport. They’re particularly important for fragile or wooden items. Bubble Wrap and Plastic Stretch Wrap Bubble wrap provides cushioning for delicate surfaces, while stretch wrap helps keep furniture components like doors, drawers, and cushions securely in place. It also acts as a barrier against dust and moisture. Furniture Sliders and Hand Trucks (Dollies) Furniture sliders allow you to glide heavy items across floors without causing scuffs or scratches. A hand truck or dolly makes moving large or bulky furniture easier and helps prevent injuries. Heavy-Duty Packing Tape and Tie-Down Straps Durable packing tape is necessary for securing wrapping materials and sealing boxes. Tie-down straps help keep furniture stable and in place inside the moving truck, reducing the risk of shifting during transport. Edge and Corner Protectors  These provide extra protection for vulnerable edges on mirrors, tables, and dressers, preventing chips, cracks, or dents especially when moving through narrow spaces or tight doorways. Labeled Boxes and Ziplock Bags for Small Hardware Use small resealable bags to store screws, bolts, and other hardware from disassembled furniture. Label each bag clearly and either tape it to the furniture piece or place it in a marked box so everything stays organized and easy to find during reassembly. With these essential supplies, your move will be safer, smoother, and more efficient helping you protect your investment in your furniture every step of the way. Step-by-Step | How to Prepare Furniture for Long-Distance Moving Properly getting your furniture ready is one of the most important parts of a successful long-distance move. In this step-by-step guide, we’ll walk you through exactly how to prepare furniture for long-distance moving so it stays safe and damage-free during the trip. 1. Take Inventory Before you do anything else, make a complete list of all the furniture you’re moving. Write down the name and condition of each item. Tip: Take clear photos of each piece. This helps with organization and is useful for insurance if anything gets damaged. 2. Clean and Disassemble Furniture A clean surface prevents dirt and mold from spreading during the move. Clean thoroughly: Wipe down all surfaces to remove dust, grime, or moisture. This is especially important for upholstered or wooden furniture. Disassemble parts: Remove legs from tables and chairs, take off cushions, remove shelves, and detach glass tops. This makes the furniture easier to pack and less likely to break. Keep small parts safe: Hardware, bolts, and screws should be taped to the appropriate piece of furniture and kept in ziplock bags with labels. 3. Protect Fragile Components Fragile elements of furniture require special attention when preparing for long-distance moving. Wrap glass and delicate surfaces with bubble wrap and secure them with tape. Use furniture blankets or pads to cushion larger items. Label fragile items like mirrors, glass panels, or delicate finishes so movers know to handle them with care. 4. Wrap and Secure Everything Once your furniture is clean and disassembled, it’s time to wrap and secure it. Use stretch wrap to hold loose pieces in place and protect against dust and moisture. Cover larger items with moving blankets or pads. This keeps dents and scrapes at bay while being transported. Tape everything down carefully, avoiding direct contact with wooden or painted surfaces to prevent damage. Best Ways to Pack Furniture for Moving Packing your furniture properly is one of the most important steps to ensure a safe and damage-free move especially during long-distance relocations. Using the right techniques not only protects your belongings but also saves time during loading and unpacking. Here’s a practical guide to the best ways to pack furniture for moving: 1. Follow a Room-by-Room Packing Plan One of the smartest ways to stay organized during a

How to Move from State to State | Easy Step-by-Step Guide
Moving and Packing Services

How To Move From State To State

How to move from state to state involves more than just packing boxes—it requires careful planning and preparation. People often consider relocating to another state for jobs, family, lifestyle changes, or a lower cost of living. Whatever the reason, moving to a different state can be stressful without a solid plan. To avoid unexpected expenses and last-minute chaos, organization is key. You will be guided through the entire process by this guide. We’ll assist in making your relocation easier, from organizing and packing to handling logistics and settling in. Moving to a different state can be a fulfilling and beneficial experience if done correctly. Considerations for Relocating from One State to Another Moving from one state to another is a major life decision that involves more than just packing boxes. Whether you’re relocating for a new job, family, or a change of scenery, it’s important to weigh several key factors before making the leap. When relocating to a different state, keep the following points in mind: 1. Cost of Living Differences One of the biggest adjustments when moving to a different state is the cost of living. This includes: Rent and housing prices – A home that’s affordable in one state may be out of reach in another. Taxes – Look into state income tax, property tax, and sales tax rates. Utilities and transportation – Electricity, water, gas, and public transit costs can vary widely. Understanding these differences can help you budget more effectively and avoid financial surprises. 2. Employment Opportunities Investigate the employment market in your new state before relocating: What industries are growing? Are salaries comparable to your current area? Is your profession in demand? You should also consider whether your current employer has offices in the new state or if remote work is a possibility. 3. State Laws and Regulations Different states have different laws that can impact your day-to-day life: Vehicle registration and driver’s license – Some states have stricter timelines and fees. Healthcare systems – Medicaid eligibility and health insurance regulations vary. Insurance requirements – Auto and home insurance policies may need to be adjusted. Make sure you understand the legal and bureaucratic changes that come with moving to a different state. 4. School Systems and Education If you have children, evaluate the quality of the school systems in the area: Check school rankings and reviews. Explore public vs. private education options. Look into extracurricular activities and special programs. When relocating from one state to another, this is an essential step to make sure your children have a seamless transition. 5. Lifestyle and Culture Each state has its own culture and pace of life. Consider: Climate – Are you ready for hotter summers, colder winters, or more humidity? Social environment – Think about diversity, friendliness, and community vibe. Political climate – Some people prefer to live in a state that aligns with their values. These factors can significantly affect your comfort and long-term happiness. 6. Moving Budget Determine how much you can realistically spend on the move itself: Professional movers vs. DIY move Travel expenses – Gas, flights, hotels Temporary housing – If you don’t have a permanent place lined up Unexpected costs – Deposits, setup fees, etc. A well-planned budget is essential to avoid stress and overspending when moving to a different state. You can also read about How Do You Move Cats Across Country. How to Move from State to State in 7 Easy Steps Relocating to another state can feel overwhelming, but with a clear plan and the right support, it doesn’t have to be. Use this easy moving out of state checklist to ensure a stress-free and seamless transfer, whether you’re going for a new start, family, or employment. 1. Research Your New State Before you pack a single box, spend time learning about your new location: Cost of living – Understand how expenses like housing, groceries, and taxes compare. Job market – Explore employment opportunities in your field. Housing options – Consider whether you’ll rent or buy, and research neighborhoods that suit your lifestyle. This first step lays the foundation for a well-informed move. 2. Create a Moving Checklist You may maintain organization by using a thorough moving out of state checklist. Break your tasks down by timeline: 8 weeks out: Start researching movers or truck rentals. 6 weeks out: Begin sorting and decluttering. 4 weeks out: Notify landlords, employers, and schools. 2 weeks out: Confirm travel plans and packing progress. Moving day: Final walkthrough, load truck, clean home. Having a plan keeps the process manageable from start to finish. 3. Rent a truck or work with a moving company. Decide if you’ll go the DIY route or hire professionals: Hiring movers saves time and physical labor but comes at a higher cost. Renting a truck is more budget-friendly but requires more effort. 4. Sort and Declutter Don’t bring unnecessary items across state lines. Go through each room and decide what to: Keep Donate Sell Throw away 5. Change Your Address and Transfer Utilities Don’t forget to update your info with key services: File a change of address with the USPS. To transfer or cancel services (gas, water, electricity, and internet), get in touch with the utility companies. Banks, insurance companies, and subscription services should update your address. This step prevents service interruptions and lost mail. 6. Pack Strategically Both ends of your move can be less stressful if you pack wisely: Indicate the room and contents of each box clearly. Stow crucial documents, toiletries, and clothing in an essentials bag. Use extra care with fragile items and valuables. Efficient packing makes unpacking much easier when you arrive. 7. Prepare for Travel and Arrival Plan your journey, especially if you’re driving: Map out your travel route and book accommodations if needed. Confirm move-in readiness—make sure utilities are on and keys are available. Keep contacts handy in case of emergencies or last-minute issues. Need Packing Help in Los Angeles? If you’re located in the Los Angeles area and need professional

How Do You Pack Clothes When Moving | 10 Easy Steps
Moving and Packing Services

How Do You Pack Clothes When Moving in 10 Easy Steps

Relocating to a new residence may be both thrilling and daunting. Packing, especially for your clothes, is one of the most time-consuming aspects of any move. Whether you’re relocating across town or across the country, knowing the best way to pack clothes for moving can save you time, money, and frustration. At Chamomile Go, we’re here to make your moving journey smoother with a simple, effective guide. Below, we walk you through how to pack clothes when moving in 10 easy steps. From how to sort clothes before a move to how to pack clothes without wrinkles, we’ve got all the pro tips you need. Step 1: Start With a Clothing Purge Before you even touch a box, it’s time to declutter. The fewer clothes you move, the easier the entire process becomes. How to Sort Clothes Before a Move: Separate by season: Keep only what you’ll need in the next few months. Donate or discard: Anything you haven’t worn in a year should go. Sort by type: Group items like jeans, shirts, dresses, and activewear together. This step ensures you’re only packing what you truly want and need — reducing weight and saving space. Step 2: Choose the Right Supplies Investing in the right materials will protect your clothing and make packing more efficient. Recommended supplies: Clothes boxes for moving (standard and wardrobe boxes) Vacuum-seal bags Suitcases and duffel bags Packing paper or tissue Labels and markers Garment bags When in doubt, opt for using wardrobe boxes for moving. They allow you to hang clothes directly from your closet, preventing wrinkles and saving time on unpacking. Step 3: Organize By Category Once sorted, organize your clothes by category. This will make both packing and unpacking more streamlined. Group items like: Formal wear Casual wear Workout gear Undergarments Accessories This organization also helps ensure you use the best way to pack clothes to move without mixing unrelated items and making unpacking chaotic. Step 4: Wash Everything Before Packing It might sound obvious, but packing dirty or sweaty clothes is a common mistake. Even a small stain or odor can set into fabric during the moving process. Chamomile Go tip: Dry your clothes completely before packing to avoid mustiness or mold, especially if you’re storing them for a while. Step 5: Use Wardrobe Boxes for Hanging Clothes One of the best ways to pack clothes for moving is to use wardrobe boxes — tall boxes with built-in hanging rods. Why using wardrobe boxes for moving is smart: Prevents wrinkles Easy transfer from closet to box Saves time on ironing later Ideal for suits, dresses, and delicate garments Wardrobe boxes are especially useful if you’re short on time and want your hanging clothes to remain in pristine condition. Step 6: Fold and Roll for Non-Hanging Clothes Not everything needs to hang. For most casual items, folding or rolling is ideal—an approach we recommend at Chamomile Go, your trusted choice for packing services in Los Angeles. How to pack clothes without wrinkles: Rolling: Great for t-shirts, jeans, and stretchy fabrics. Folding: Better for button-downs and items prone to creasing. To prevent wrinkling and friction, place packing paper between layers. This method works perfectly in clothes boxes for moving and allows for maximum space usage—a smart, professional tip from the team at Chamomile Go, experts in packing services in Los Angeles. Step 7: Use Vacuum-Seal Bags for Out-of-Season Clothes Vacuum-sealed bags reduce the size of your clothing bundles, making it easier to transport bulky items like winter coats, sweaters, or bedding. They’re perfect for maximizing space in your clothes boxes for moving, especially when you’re short on room. These bags not only compress items efficiently but also help keep your move organized by segmenting clothing you won’t need immediately. Bonus:They’re also moisture-resistant, which is ideal if your move involves storage or potential weather delays. Plus, they offer added protection from dust, insects, and odors — keeping your garments fresh until you’re ready to unpack them in your new home. Using them is one of the best ways to pack clothes to move, especially when dealing with seasonal items that won’t be worn right away. Step 8: Pack Suitcases and Duffel Bags Strategically Why waste space in your suitcases? Use them to pack folded clothes, shoes, or accessories. Chamomile Go tip: Use socks and small items to fill gaps between layers, making the most of every inch. This approach also ensures you can find essentials easily when you arrive — especially if you’re not unpacking right away. Step 9: Label Everything Clearly Proper labeling can make or break your moving experience. You don’t want to dig through ten boxes just to find your pajamas. Labeling tips: Indicate contents (“Winter sweaters,” “Work clothes”) Use color-coded labels by room Mark fragile or delicate boxes clearly Keeping your wardrobe organized during a move helps reduce stress and speeds up the unpacking process. Step 10: Keep a “First Week” Clothing Bag Pack a separate bag with a few outfits, undergarments, and toiletries to get you through your first week at the new place. This is one of the most overlooked yet best ways to pack clothes to move because it ensures you’re not scrambling for essentials while unpacking. Include: 3–5 casual outfits Work attire (if applicable) Sleepwear and socks Undergarments A jacket or sweater This small step saves huge headaches later. Additional Tips for Packing Clothes When Moving Avoid overpacking boxes — heavy boxes can burst or become difficult to carry. Use drawer dividers for dresser items to pack them intact (if allowed by your mover). Don’t forget about shoes — pack them separately or wrap them to avoid damaging clothes. Line boxes with plastic or tissue paper if there’s a risk of moisture. Final Thoughts Knowing how to pack clothes when moving doesn’t have to be overwhelming. By following these 10 steps, you’ll protect your wardrobe, save time, and arrive at your new home feeling organized and ready. To recap, you now know: How to sort clothes

How Do You Move Cats Across Country Without Stress
Moving and Packing Services

How Do You Move Cats Across Country

How do you move cats across country without causing them stress or discomfort? Moving cross country with cats can be challenging, as cats are sensitive to change and travel. Choosing the right transport method is key—flying offers speed, while driving gives you more control. Each has its pros and cons depending on your cat’s temperament and health. A successful cross country move with cats requires preparation, patience, and attention to detail. This guide covers the two main transport options—flying vs. driving—and offers tips for planning, travel day, and settling in. With the right approach, your cat can arrive safely and comfortably. Preparing Your Cat for the Big Move Moving cross country with cats can be a stressful experience—for both you and your feline companion. Due to their habitual nature, cats can become agitated by even minor changes. When it comes to moving cats across country, early preparation is key to ensuring a smooth transition. Here’s how you can help your cat feel secure, comfortable, and ready for the journey. The Importance of Early Preparation Cats are highly sensitive to environmental changes. That’s why it’s crucial to start preparing weeks—or even months—in advance. Introduce your cat to moving-related items like boxes, packing tape, and suitcases gradually so they can acclimate without becoming overwhelmed. Early prep also gives you time to address any health, behavioral, or logistical concerns before the big day arrives. Vet Check-Up and Health Certificate Before moving cross country with cats, schedule a visit to the vet. This ensures your pet is in good health and up-to-date on vaccinations. Many states require a health certificate if you’re traveling across state lines, especially by plane. It’s best to confirm travel requirements ahead of time to avoid complications. Microchipping and ID Tags One of the biggest fears when moving cats across country is the risk of them getting lost. Ensure your cat is microchipped, and that the information is current. A collar with an ID tag that includes your contact details (and possibly a temporary address or travel info) adds another layer of safety. Crate Training: Helping Your Cat Feel Safe in a Carrier A well-trained cat carrier can make a world of difference. Start crate training well in advance. Let your cat explore the carrier freely by placing it in a favorite room with the door open. Add treats, toys, or soft bedding to create positive associations. Gradually increase the time your cat spends inside to build comfort and trust. Managing Anxiety: Pheromones, Calming Sprays, or Vet-Prescribed Sedatives Moving cross country with cats can spike anxiety levels. To ease their stress, consider using feline pheromone diffusers or sprays (like Feliway) in their crate or temporary living space. For highly anxious cats, consult your vet about calming treats or sedatives designed specifically for travel. Never give your cat medication without first consulting a specialist. You can read about our moving services in Los Angeles. Tips for Flying with Your Cat Flying with your cat can be stressful, but with some planning, it can be a smooth experience—especially if you’re moving cats across country. Here’s how to prepare: 1. Airline Policies and Pet Travel Regulations Always check your airline’s pet travel regulations in advance. Not all airlines allow pets in the cabin, and those that do often have specific carrier size and weight limits. You’ll also need a health certificate from your vet, especially when moving cats across country. 2. Carrier Requirements & In-Cabin vs. Cargo Make use of a soft-sided carrier that fits beneath the seat and has been approved by the airline. In-cabin travel is the best way to move a cat across country—it’s safer and less stressful than cargo. Select a direct flight and be sure to clearly identify the carrier if cargo is your sole choice. 3. Feeding, Hydration & Litter Box Planning Feed your cat about 4–6 hours before the flight to avoid nausea. Offer water regularly but in small amounts. In the event of an accident, line the carrier with an absorbent pad. Consider using a travel litter box before heading to the airport. 4. At the Airport: Navigating Security & Boarding At security, you’ll need to take your cat out of the carrier and carry them through the scanner. Use a harness to prevent escape. Board early if allowed, and keep the carrier under the seat in front of you. 5. Keeping Your Cat Calm During the Flight Familiarize your cat with the carrier before the trip. Use calming sprays or pheromone wipes. Avoid opening the carrier in midair and speak quietly. Ask your veterinarian about sedatives for pets who are nervous. With preparation, the best way to move a cat across country is by keeping them close, calm, and cared for throughout the journey. Choosing the Right Flight When Moving Cats Across Country When moving cross country with cats, selecting the right flight can make a big difference in your cat’s comfort and safety.  1. Best Airlines for Pet Travel Not all airlines are equally pet-friendly. Alaska Airlines, JetBlue, and Delta are often recommended for moving cats across country due to their reliable in-cabin pet policies and reasonable fees. Always check their rules before booking. 2. Booking Direct Flights to Reduce Stress A direct flight is the best way to move a cat across country. It limits your cat’s travel time and avoids the stress of layovers and transfers. Fewer transitions mean a smoother trip for both of you. 3. Ideal Flight Times and Weather Considerations Choose early morning or late evening flights during summer, and midday flights during winter, to avoid temperature extremes. If you’re moving cross country with cats, plan around mild weather to keep your cat comfortable. 4. Pet Travel Fees and Reservation Process Most airlines charge around $95–$125 for in-cabin pets. Book early—only a limited number of pets are allowed per flight. When moving cats across country, call the airline directly to confirm your pet’s spot and ask about specific requirements. A calm, direct, and well-timed flight on a

How to Pack Glasses for Moving | Step-by-Step Guide
Moving and Packing Services

How To Pack Glasses For Moving

How to pack glasses for moving is an essential skill to ensure your fragile items arrive at your new home safely and intact. Glassware is highly susceptible to cracks, chips, and complete breakage if not handled properly, making it one of the most vulnerable items during a move. Whether you’re dealing with delicate wine glasses, everyday tumblers, or large glass table tops, understanding the best way to pack glasses for moving can prevent costly damage. The key to reducing risk is using the proper glass packing materials, such as robust boxes, packing paper, and bubble wrap. This complete guide will walk you through everything you need to know to protect your glass items and pack with confidence. Things You’ll Need to Bring with You When You Move Glassware and other delicate objects need to be packed with extra care while getting ready to move. Knowing what you’ll need to pack glasses for moving can help prevent breakage and make unpacking much easier. Here’s a list of essential tools and materials to safely secure your items using the right glassware boxes for moving. Essential Supplies: Sturdy BoxesWhen storing glassware, use sturdy, corrugated boxes—dish pack cartons are great. These are made to keep delicate objects and have double walls for extra security. Packing Paper Use plain, ink-free packing paper to individually wrap each glass. This cushions the glass and prevents scratches. Bubble Wrap For an additional layer of protection, wrap precious or delicate items with bubble wrap. Cardboard Dividers Insert dividers into your glassware boxes for moving to keep glasses from knocking into each other during transit. Packing TapeUse sturdy packing tape to secure the top and bottom of your boxes to prevent mishaps. Marker for Labeling Label each box clearly with “Fragile” and “Glassware” to ensure careful handling. Include room destinations to simplify unpacking. Having the right tools and knowing what you’ll need to pack glasses for moving can make a big difference. Your fragile belongings can reach your new house undamaged if you have the necessary materials and glassware packing boxes. You should read about our moving services in Los Angeles. Preparing The Boxes For Packing Glasses Preparing the boxes for packing glasses is a critical step to ensure your fragile items survive the move intact. Before placing any glassware inside, take the time to properly set up and reinforce the boxes for packing glassware. Here’s how to do it right: Reinforce Box Bottoms with Extra Tape Glass items can be heavy, so secure the bottom of each box with multiple strips of strong packing tape. This prevents the box from collapsing under weight. Add a Cushion Layer of Crumpled Paper or PaddingUse lots of crumpled paper, foam peanuts, or other glass packaging materials to line the bottom of each box. This base cushion absorbs shock during transit. Set Up Dividers or Custom Compartments Use cardboard dividers or create custom sections to keep glasses from shifting. These are especially useful in specialty boxes for packing glassware, such as dish pack boxes. Label the Boxes Clearly Once packed, use a marker to label each box: “Fragile – Glassware – This Side Up.” Clear labeling helps movers handle them with extra care and ensures proper orientation. Taking a few extra minutes to correctly prepare your glassware boxes for moving using the right packing material for glass can prevent damage and save you the frustration of broken items. How to Pack Glasses for Moving Knowing how to pack glasses for moving properly can save you the heartbreak of unpacking shattered glassware. Follow this step-by-step guide to ensure your fragile items stay safe in transit. It’s considered the best way to pack glasses for moving whether you’re relocating across town or across the country. Step-by-Step Guide: Wrap Each Glass Individually Use plain packing paper or bubble wrap to wrap each glass thoroughly. This provides a protective barrier and prevents scratching. Quality packing material for glass is essential here. Nest Carefully (If Appropriate) If glasses are similar in shape and strong enough, you can nest smaller ones inside larger ones. Always separate them with extra paper or padding, and avoid nesting delicate or stemmed glasses. Place Vertically in Box Compartments Always place wrapped glasses upright—how they naturally sit. This position reduces pressure on fragile edges. For extra protection, pack glassware in cartons with cardboard dividers. Fill Empty Spaces with Crumpled Paper Prevent shifting by stuffing all gaps with crumpled paper or other packing material for glass. Movement inside the box is what typically leads to breakage. Add a Cushioning Top Layer Before sealing the box, add one final layer of padding on top for extra shock absorption. Pro Tips: Don’t Overload the BoxHeavy boxes are more prone to fall and are more difficult to handle. Keep weight manageable. Use Dish Packs or Liquor Boxes with DividersThese are the best boxes for packing glassware since they have built-in compartments that are specifically made to safeguard fragile pieces. By following this method, you’ll be using the best way to pack glasses for moving, ensuring your glassware arrives safely at your new home. For packing services in Los Angeles you can contact us. How to Pack a Glass Table Top for Moving Glass table tops are heavy, delicate, and expensive to replace—so it’s essential to handle them with care. Here’s how to properly and safely pack a glass table top for moving: Step-by-Step Instructions: Clean and Dry the Glass Thoroughly Start by wiping the surface clean to remove dust, fingerprints, and debris. A dry surface ensures packing materials stick properly and don’t cause scratches. Apply Painter’s Tape in an “X” or Grid Pattern Use painter’s tape across the surface in a large “X” or grid. If the glass breaks during the move, this can assist contain the pieces, but it won’t stop it from breaking. Wrap in Multiple Layers of Bubble Wrap or Moving Blankets For maximum protection, first wrap the glass in several layers of bubble wrap. You can also use padded moving blankets for extra

What to Consider When Moving to a New State Guide
Moving and Packing Services

What to Consider When Moving to a New State | 20 Things to Keep in Mind

What to consider when moving to a new state goes far beyond just packing boxes and hiring a moving truck. It’s a major life transition filled with excitement, opportunity, and—let’s be honest—a fair amount of stress. Whether you’re relocating for a new job, family, or simply a change of scenery, there are many important factors to keep in mind to ensure a smooth and successful move. To make your transition smoother, we’ve compiled the ultimate guide of 20 key things to keep in mind when moving to a new state. If you’re looking for a moving to another state checklist, this is it. From legalities to logistics, we’ve got you covered. 1. Research the Cost of Living Different states have drastically different living costs. What you spend on rent, groceries, healthcare, and even gas can vary widely. Don’t forget to compare the cost of living in your destination state with that in your current state. 2. Check State and Local Taxes Income tax, sales tax, and property taxes are crucial to consider. States like Florida and Texas have no income tax, while others like California and New York are on the higher side. You can better arrange your budget if you understand this. 3. Evaluate the Job Market Unless you’re relocating with a job in hand, take time to research employment opportunities in your field. Some industries are state-specific, so it’s best to know where your skills are in demand. 4. Research the Housing Market Before you move, look into renting versus buying in your new state. Even within a city, housing prices can vary dramatically. Use online real estate platforms to get a sense of what to expect. 5. Create a Moving Budget Include everything: movers, packing supplies, gas, plane tickets, hotel stays, and deposits for utilities or rentals. This is a critical part of any move out of state plan. 6. Use a ‘Moving to Another State Checklist’ There’s so much to do, it’s easy to miss something. A thorough checklist for moving to a different state can keep you organised and make sure nothing is overlooked. 7. Hire a Professional Moving Company A professional mover can make your life exponentially easier. If you’re based in California, Chamomile Go offers expert moving services in Los Angeles as well as packing services in Los Angeles, perfect for any out-of-state move. 8. Update Your Address Don’t forget to notify the USPS, your banks, credit card companies, and subscription services. This is also the perfect time to clean up your mailing list! 9. Transfer Utilities and Services Before you move in, make sure your new home has gas, electricity, water, internet, and other utilities installed. Terminate or move your previous address’s services. 10. Get a New Driver’s License and Vehicle Registration Each state has different rules and deadlines for transferring your driver’s license and registering your vehicle. Don’t wait too long—many states require updates within 30 days of establishing residency. 11. Register to Vote in Your New State You’ll need to register in your new state to vote in elections. This is a quick task that often gets overlooked in the chaos of moving. 12. Understand Healthcare and Insurance Requirements Your current health insurance plan may not offer the same coverage in your new state. Research local providers and make necessary updates. 13. Find New Schools (If You Have Kids) If you’re moving with children, researching the school district should be a top priority. Use local education rankings and visit schools if possible before deciding on an area. 14. Consider the Weather and Climate If you’re used to a temperate climate, moving to a state with extreme winters or humid summers will be an adjustment. Your wardrobe (and maybe even your car) might need an upgrade. 15. Plan Your Moving Timeline Start planning at least two months ahead. Use a calendar to plot out packing, utility transfers, booking movers, and setting up your new home. 16. Declutter Before You Pack Take this as an opportunity to donate, sell, or trash what you don’t need. Downsizing before a move makes packing simpler and reduces moving costs. 17. Label Boxes Clearly Be specific: Instead of just writing “kitchen,” note “pots & pans” or “glassware.” This will save you headaches when unpacking. 18. Keep Important Documents Accessible Birth certificates, social security cards, medical records, and legal documents should travel with you—not in a moving truck. 19. Make New Connections Moving to a different state can feel isolating at first. Join local groups, attend community events, or connect via social media platforms to meet new people. 20. Be Patient with the Transition Even with the best planning, moving is a huge life change. It’s okay to feel overwhelmed. Give yourself time to adjust emotionally and mentally. Tips for Moving Out of State: Bonus Insights Use apps and tools. There are plenty of digital planners and checklists to streamline your move. Save receipts. If your move is job-related, you might be eligible for a tax deduction. Visit beforehand. If possible, spend a few days in your new city to familiarize yourself with the area. These tips for moving out of state will help you cover all your bases and reduce moving-day stress. Relocating to Another State Tips Here are a few relocating to another state tips that often go unmentioned but can make a big difference: Keep cash handy. Not all places accept cards—especially when you’re on the road. Bring an emergency bag. Include medications, chargers, clothes, and snacks for at least 2–3 days. Check pet regulations. Some states have breed-specific laws or require quarantines. Moving to a Different State Tips: Final Thoughts Relocating is more than just a physical move—it’s an emotional and psychological journey as well. These moving to a different state tips should make the process smoother, helping you settle into your new home with less hassle and more confidence. And remember, if you’re starting your move from Southern California and need help with packing or logistics, Chamomile Go provides top-rated packing services

How Long Does It Take to Unpack After Moving Explained
Moving and Packing Services

How Long Does It Take To Unpack After Moving

How long does it take to unpack after moving depends on several factors, such as the size of your home, the number of boxes, and your personal schedule. The moving process doesn’t truly feel complete until the last box is unpacked and everything finds its place. Making a new home seem like home after a relocation requires unpacking. It helps restore routine, reduce stress, and creates a sense of comfort in your new environment. Many people feel overwhelmed by the thought of unpacking after move, unsure of where to begin. With a clear plan and steady progress, the process becomes more manageable. Prioritizing essentials and tackling one room at a time can make settling in much smoother. How Long Does It Take to Unpack After Moving? Unpacking after a move can feel just as overwhelming as packing—if not more so. Whether you’re settling into a new home or relocating your business, the timeline to fully unpack and organize your space can vary widely based on several factors. On average, it takes 1–2 weeks for basic unpacking and up to 1–2 months for complete organization. But how long should you realistically expect your unpacking process to take? Residential vs. Commercial Moves The time it takes for unpacking after a move differs significantly between house unpacking services and office unpacking. House Unpacking Services For residential moves, homeowners typically aim to unpack essentials—like kitchenware, clothing, and toiletries—within the first few days. Full organization of all rooms, including garages, closets, and decorative items, can stretch out over several weeks or even months, especially if you’re balancing work and family responsibilities. Average timeframe for a standard household: Basic unpacking: 5–14 days Complete organization: 1–2 months Office Unpacking Office unpacking often involves coordination among multiple departments and technology setups, making it more complex. However, businesses usually face time constraints to resume operations quickly, so they may hire professional services to speed up the process. Average timeframe for a small to medium-sized office: Basic unpacking: 2–5 days Complete setup and organization: 2–4 weeks What Affects Your Unpacking Timeline? Size of the property: A studio apartment will take far less time than a five-bedroom house or large office. Number of belongings: More boxes = more time to unpack. Organization level during packing: Well-labeled boxes help you unpack faster. Use of professional services: Hiring house unpacking services or a specialized office unpacking team can cut down the time significantly. Availability and schedule: Are you unpacking on evenings and weekends, or do you have full days to dedicate? Realistic Expectations Set goals by room or function. For example: Day 1–3: Essentials and high-use areas (kitchen, bathroom, bedroom) Week 1: Living room, home office, and clothing organization Month 1–2: Storage areas, decorations, paperwork If you’re running a business, focus on operational areas first—like workstations and meeting rooms—before setting up non-essential zones. For moving services in Los Angeles you can contact us. Unpacking a House or Office After Moving Unpacking after a move can be an intense process, whether you’re settling into a new home or getting your business back up and running. Taking a strategic approach can help you stay organized, reduce stress, and get back to normal faster. Below is a breakdown of how to handle both house and office unpacking efficiently. Unpacking a House For most families, unpacking after a move into a new home requires a room-by-room strategy. This allows you to prioritize essentials and gradually create a comfortable living space. Room-by-Room Approach Start by unpacking high-priority areas: Kitchen: Organize dishes, cookware, and food storage early so meals are easy to prepare. Bathrooms: Set up toiletries, towels, and cleaning supplies on day one. Bedrooms: Make beds, unpack clothes, and create a restful environment quickly. Once the essentials are handled, move on to: Living areas Storage spaces Garages and attics Decorative and non-essential items Managing Personal and Family Needs Unpacking with children or pets can be more complex. Keep favorite toys, daily-use items, and comfort objects within reach. Create a temporary routine to bring structure during the adjustment period. Unpacking an Office Office unpacking needs to be efficient and organized to avoid disrupting business operations. Planning ahead and involving your team can make all the difference. Setting Up Functional Workstations Quickly Start by arranging desks, chairs, and core equipment so your team can return to work with minimal disruption. Assign unpacking tasks by department to keep things moving. Reconnecting Tech and Equipment Coordinate IT support early on to reconnect: Computers and monitors Phone systems Printers and networking equipment Make sure power sources and internet connections are set up before unpacking tech components. Importance of Minimizing Downtime Every day your office isn’t fully functional can result in lost productivity. That’s why some businesses hire professional office unpacking services to speed up the process. Prioritize critical operations first, such as customer service desks or executive offices, and then handle support areas like break rooms and storage. You can also read about our packing services in Los Angeles. Factors Influencing the Time to Unpack a House or Office The time it takes for unpacking after a move varies widely depending on several key factors. Whether you’re organizing a new home or completing an office unpacking process, understanding what affects the timeline can help you set realistic expectations and plan accordingly. 1. Size of the Home or Office Larger spaces naturally take longer to unpack. A two-bedroom apartment might be manageable in a few days, while a five-bedroom house or a large commercial office could require several weeks. More rooms mean more boxes, furniture, and organizational decisions. 2. Number of Movers or Helpers If you’re unpacking solo, the process will take significantly longer than if you have family, employees, or professionals helping. Hiring house unpacking services or a dedicated office unpacking team can dramatically speed up the process and reduce stress. 3. Level of Organization During Packing How you packed directly impacts how smoothly you can unpack. Clearly labeled boxes and categorized packing (e.g., by room or function) make it easier to

How Much Do PODs Cost for Moving in 2025?
Moving and Packing Services

How Much Do Pods Cost For Moving

How much do PODS cost for moving? This is a common question for individuals and families planning a relocation and looking for convenient, flexible options. When it comes to moving and storage, there are various choices ranging from full-service moving companies to DIY truck rentals. One increasingly popular solution is PODS (Portable On Demand Storage), which provides a unique mix of flexibility and convenience by allowing customers to pack and load at their own pace. In this article, we’ll explore everything you need to know about moving with PODS cost, including how pricing is determined, factors that influence the total expense, and whether this method is a cost-effective alternative to traditional moving services. What are PODS and How Do They Work? PODS stands for Portable On Demand Storage, a flexible moving and storage solution designed to simplify the relocation process. Whether you’re moving locally or across the country, moving with PODS offers a convenient, stress-reducing alternative to traditional moving methods. Definition of PODS (Portable On Demand Storage) PODS are secure, weather-resistant storage containers delivered directly to your home or business. They provide a do-it-yourself option that lets you pack and load at your own pace, without the pressure of a one-day move. How the PODS Process Works Container Delivery PODS delivers a portable storage container to your current location at a scheduled time. You don’t need to rush—once it’s delivered, you can take your time packing. Packing and Loading by the Customer You’re in control. You pack and load the container yourself, allowing for careful handling of fragile items and organization that fits your specific needs. PODS also offers helpful packing supplies and tips if needed. Pickup and Transport by PODS When you’re ready, PODS picks up the loaded container and transports it to your new address or one of their secure storage centers. This step is especially helpful for long-distance moves or when move-in dates don’t align. Delivery to New Location or Storage CenterYou can unpack the container whenever you want when it is delivered to your new site.Alternatively, it can be stored at a PODS storage facility until you’re ready. Different Sizes Available and Typical Use Cases PODS containers come in several sizes to suit different needs: 7-foot container: Ideal for small apartment moves, college students, or temporary storage. 12-foot container: Best for 2- to 3-room homes or partial household moves. 16-foot container: Perfect for larger homes (3 to 4 rooms), renovations, or full-house relocations. For moving services in Los Angeles you can contact us. What Can You Expect to Pay Using PODS? If you’re considering moving with PODS, understanding the cost breakdown can help you plan and budget more effectively. PODS offers a flexible and customizable pricing model based on several key components. Breakdown of PODS Pricing Components Container Size PODS offers three main container sizes, and pricing varies accordingly: 7-ft container – Ideal for small moves or limited storage needs (least expensive). 12-ft container – Suited for 2- to 3-room homes (mid-range). 16-ft container – Best for larger moves (most expensive). Duration of Use PODS typically charges on a monthly basis, so the longer you keep the container, the more you’ll pay. This is especially relevant if you need storage or plan to pack/unpack slowly. Distance Moved The farther you move, the higher the transportation costs. Local moves are significantly less expensive than long-distance relocations. Storage Needs If you choose to store your container at a PODS facility, expect additional monthly storage fees. These vary by region and container size. Location-Based Factors Your origin and destination also affect pricing. Urban areas, regions with high demand, or locations with limited accessibility may increase costs. Example Price Ranges While final costs depend on the above factors, here’s a general idea of what you can expect: Local Moves: $200–$800 Includes delivery, pickup, and a month’s rental for a single container. Long-Distance Moves: $1,000–$5,000+ Varies based on distance, container size, and duration of use. Additional Fees to Consider When moving with PODS, don’t forget to factor in these potential extra costs: Insurance (Contents Protection Plans): Optional, but recommended Taxes: Based on your location Late Fees: If pickup is delayed or monthly rental is extended Lock and Packing Supplies: Sold separately Cancellation or Rescheduling Fees: May apply if plans change How Much Do PODS Cost for Moving? If you’re considering a flexible and convenient moving option, you’ve likely come across PODS. But the big question is: How much do PODS cost for moving? The cost of moving with PODS varies depending on the type of move, distance, container size, and rental duration. Let’s break down the typical moving with PODS cost for various scenarios and compare it with other moving options. Moving with PODS Cost: Detailed Examples by Move Type 1. Local Move Within a City For a local move, such as moving across town or within the same metro area, PODS can be very convenient. Estimated Cost: $200 to $600 What’s Included: Container delivery and pickup, 30-day container rental, local transportation Example: Moving within New York City with a 12-foot PODS container might cost about $400, covering delivery, storage for 30 days, and pickup. 2. Regional Move (Across State) When moving regionally, such as from one state to a neighboring state, the cost of moving with PODS increases due to distance. Estimated Cost: $600 to $2,000 What’s Included: Container rental, delivery, long-distance transportation, 30-day rental Example: Moving from Chicago to Indianapolis with a 16-foot container may cost approximately $1,200, depending on timing and container availability. 3. Long-Distance / Interstate Move For long-distance or interstate moves, PODS prices reflect the greater transportation logistics and longer haul. Estimated Cost: $1,500 to $5,000+ What’s Included: Container delivery, transportation across states, storage, and pickup Example: Moving from Los Angeles to Seattle with a 16-foot container often costs around $3,000, including transport and a 30-day rental period. Moving with PODS Cost vs. Other Moving Options PODS vs. Full-Service Movers Option Cost Range Convenience Packing Assistance PODS $200 – $5,000+ High (self-paced) DIY packing Full-Service

How Do Moving Pods Work? Your Step-by-Step Moving Guide
Moving and Packing Services

How Do Moving Pods Work

How do moving pods work in the fast-paced world of today, where ease and flexibility are crucial for relocation? Moving pods are a growingly popular alternative to traditional moving vehicles as modern moving solutions have advanced beyond them. For those that want additional time, storage, or coordination when moving, these portable storage containers provide a flexible choice.  You can see why pods are a wise decision by understanding how pods work: they are delivered to your home, packed at your own speed, and then moved to your new place or kept in storage until you’re ready. We’ll go over how pods operate, their storage benefits, the logistics of their transportation, pods moving cost, and why they’re the best option for long-distance migrations in this guide. What Are Moving Pods? Moving pods might be an excellent choice if you’re organising a relocation and want a flexible, stress-free solution. They provide ease of usage, versatility in storage, and convenience, particularly for those who wish to avoid operating big rented trucks. However, how precisely do pods operate? To help you grasp the entire procedure, here is a step-by-step breakdown. 1. Reserve Your Pod   Select the Appropriate Pod Size Selecting the appropriate pod for the amount of items you’re transporting is the first step. Selecting the appropriate container size is the first step towards comprehending how pods operate: 7-foot pod: Ideal for studio apartments and other tiny areas. A 12-foot pod is perfect for two or three rooms. 16-foot pod: Perfect for homes with three or four bedrooms or larger movers. You may prevent overspending or running out of space by understanding how pods operate in relation to your space requirements. Plan Your Delivery Once the pod size has been selected, the delivery date can be set. Weekend possibilities are among the varied durations that the majority of pod firms offer. Aligning with your moving timetable is made simple as a result. 2. Delivery of Pods to Your Address   What to anticipate The pod will be delivered by truck to your house and placed precisely where you want it, which is typically on a level surface or driveway. Clear directions aid in appropriate placement, but you are not required to be present. A mechanical lift system gently lowers the container. Rules for Local Placement Verify whether there are any laws or permit requirements in your location, particularly if you plan to display something on a roadway or in an apartment building. Understanding how pods function well is part of ensuring a seamless delivery. 3. Pack Wisely by Loading Your Things   To maximise the space in your pod: Place bulky objects at the bottom. To secure objects, use tie-down straps, padding, and blankets. To prevent shifting while being transported, distribute the weight equally. Things Not to Pack Don’t put valuable documents, perishable things, or toxic materials inside the pod. Safety restrictions typically prohibit items such as weapons, fireworks, fuel, and propane tanks. 4. Transportation or Storage Options for Short-Term or Long-Term Storage Pods’ versatility is one of their main advantages. Pods function as follows in various situations: Short-term storage: Leave the pod at home for a few days or weeks. Long-term storage: Ask the company to move the container to a secure location for storage. How It’s Moved After packing, the business will take care of shipping. You won’t have to rent or drive a truck; they will deliver the pod to your new home or storage facility. When you understand how pods operate for your convenience, this is a great advantage. 5. Final Pickup and Unloading Take Your Time When Unloading You can unload at your own leisure once your pod gets to the new place. Another reason why so many people adopt this approach is that there are no deadlines or pressures. Arrange for Pickup Simply give the provider a call to arrange for the empty container to be picked up once you’ve finished unloading. The last phase of your move will be over when they remove it from your premises. What Is the Price of a Moving Pod? A Brief Overview of Pod Moving Costs The cost of moving pods can change based on your location, the size of the container, the length of time you need it, and the distance you’re travelling. Here’s a broad concept: Local Moves: usually cost between $200 and $800. The expense of a long-distance transfer might range from $1,000 to $5,000 or more. Additional costs for storage, insurance, or longer rental terms may also apply. Compare quotations from several suppliers to get the best deal, then make your reservation as early as you can. If you want in-depth detail, you can visit What Is a Moving Pod. How Do Moving Pods Work? Step-by-Step Process If you’re planning a move and looking for a flexible, stress-free option, moving pods might be the perfect solution. Understanding how pods work can help you decide if this method suits your needs. Below is a step-by-step guide to answer the common question: How do moving pods work? 1. Booking the Pod Choosing the Right Size The first step in the process is booking your pod. You’ll need to estimate how much space you’ll need. Moving pods typically come in various sizes: 7-foot pod – Ideal for small moves, such as a studio apartment. 12-foot pod – Suitable for 2–3 rooms. 16-foot pod – Perfect for 3–4 bedroom homes. Knowing how does pod work in relation to your needs helps you select the right container size. Scheduling Delivery Once you’ve chosen the size, you can schedule the delivery date. Most companies offer flexible delivery windows, including weekends, making it easy to align with your moving timeline. 2. Delivery of the Pod What to Expect When It Arrives The company will drop the pod off at your home or specified location. You don’t need to be present, but clear instructions help with accurate placement. The container is delivered via specialized truck and placed using a mechanical lift system. Placement

Our Client's Reviews

Get In Touch With Us!

Find Us

Office Address

    Los Angeles, California

Office Phone

    +1 310-895-3517

Email Address

  Chamomilemoving@gmail.com

Let’s get you moving! Grab your FREE quote now.

Chamomile Go offers premier moving services throughout Los Angeles County, CA, ensuring a hassle-free relocation experience for all our clients.

+1 310-895-3517

24/7 Support

© 2025 Created by LocalPro1